29 Jul 2019
|
Python
Keras
Deep Learning
케라스
순환형 신경망 6 - 순환형 신경망 모델 만들기
Objective: 케라스로 RNN 모델을 구현해 본다
이번 포스팅에서는 조금 더 다양한 RNN 모델을 케라스로 구현하고 학습해 보자.
데이터 셋 불러오기
RNN을 학습하기 위한 reuters 데이터 셋을 불러온다.
import numpy as np

from sklearn.metrics import accuracy_score
from keras.datasets import reuters
from keras.preprocessing.sequence import pad_sequences
from keras.utils import to_categorical

# parameters for data load
num_words = 30000
maxlen = 50
test_split = 0.3

(X_train, y_train), (X_test, y_test) = reuters.load_data(num_words = num_words, maxlen = maxlen, test_split = test_split)

# pad the sequences with zeros
# padding parameter is set to 'post' => 0's are appended to end of sequences
X_train = pad_sequences(X_train, padding = 'post')
X_test = pad_sequences(X_test, padding = 'post')

X_train = np.array(X_train).reshape((X_train.shape[0], X_train.shape[1], 1))
X_test = np.array(X_test).reshape((X_test.shape[0], X_test.shape[1], 1))

y_data = np.concatenate((y_train, y_test))
y_data = to_categorical(y_data)

y_train = y_data[:1395]
y_test = y_data[1395:]

# 데이터의 모양 출력하기
print(X_train.shape)
print(X_test.shape)
print(y_train.shape)
print(y_test.shape)
(1395, 49, 1)
(599, 49, 1)
(1395, 46)
(599, 46)
심층 RNN 모델(Deep RNN)
여러 개의 LSTM 셀로 이루어진 layer를 여러 층 쌓아 심층 RNN 모델을 구현해 보자
from keras.models import Sequential
from keras.layers import Dense, SimpleRNN, Activation
from keras import optimizers
from keras.wrappers.scikit_learn import KerasClassifier

# 기본 RNN 모델을 구현하기 위한 함수
def deep_lstm():
    model = Sequential()
    model.add(LSTM(20, input_shape = (49,1), return_sequences = True))
    model.add(LSTM(20, return_sequences = True))
    model.add(LSTM(20, return_sequences = True))
    model.add(LSTM(20, return_sequences = False))
    model.add(Dense(46))
    model.add(Activation('softmax'))

    adam = optimizers.Adam(lr = 0.001)
    model.compile(loss = 'categorical_crossentropy', optimizer = adam, metrics = ['accuracy'])

    return model
KerasClassifier 함수로 RNN 모델을 생성한다(KerasClassifier 함수를 사용하지 않아도 만들 수 있다).
model = KerasClassifier(build_fn = deep_lstm, epochs = 200, batch_size = 50, verbose = 1)
모델 학습 및 검증
model.fit(X_train, y_train)
y_pred = model.predict(X_test)
y_test_ = np.argmax(y_test, axis = 1)
print(accuracy_score(y_pred, y_test_))
LSTM 레이어를 더 추가했지만 정확도는 기존 심층 LSTM에 비해 떨어지는 것을 볼 수 있다. 그렇다면 레이어를 추가하는 것 말고 RNN을 개선하는 어떠한 방법이 있을 지 알아보자.
양방향 RNN (Bidirectional RNN)
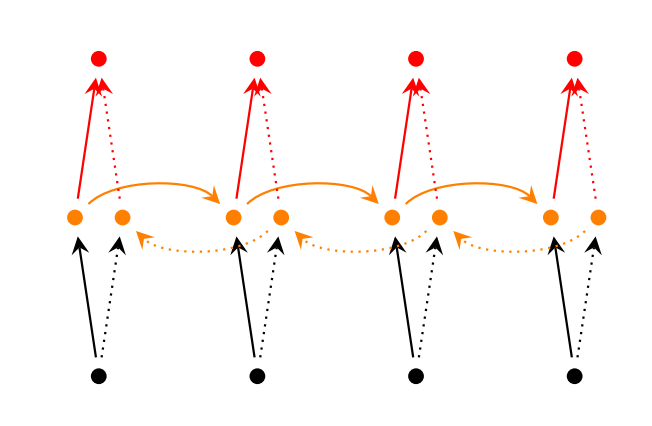
- 기존의 RNN은 한 방향(앞 -> 뒤)으로의 순서만 고려하였다고 볼 수도 있다. 반면, 양방향 RNN은 역방향으로의 순서도 고려하는 모델이다.
- 실제로는 두 개의 RNN 모델(순방향, 역방향)을 만들어 학습 결과를 합치는 인공신경망 모델에 가깝다.
# 양방향 RNN을 구현하기 위한 함수
from keras.layers import Bidirectional

def bidirectional_lstm():
    model = Sequential()
    model.add(Bidirectional(LSTM(20, return_sequences = False), input_shape = (49,1)))
    model.add(Dense(46))
    model.add(Activation('softmax'))

    adam = optimizers.Adam(lr = 0.001)
    model.compile(loss = 'categorical_crossentropy', optimizer = adam, metrics = ['accuracy'])

    return model
model = KerasClassifier(build_fn = bidirectional_lstm, epochs = 200, batch_size = 50, verbose = 1)
model.fit(X_train, y_train)
y_pred = model.predict(X_test)
y_test_ = np.argmax(y_test, axis = 1)
print(accuracy_score(y_pred, y_test_))
더 적은 숫자의 레이어를 활용했음에도 불구하고 양방향 RNN이 심층 RNN에 비해 더 높은 성능을 자랑하는 것을 볼 수 있다.
심층 양방향 RNN (Deep Bidirectional RNN)
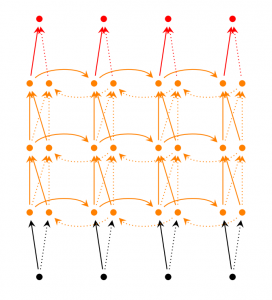
- 양방향 RNN 모델도 다른 RNN 모델과 같이 심층적으로 레이어를 쌓아 올릴 수 있다.
# 다층 양방향 LSTM을 구현하기 위한 함수
def deep_bidirectional_lstm():
    model = Sequential()
    model.add(Bidirectional(LSTM(10, return_sequences = True), input_shape = (49,1)))
    model.add(Bidirectional(LSTM(10, return_sequences = True)))
    model.add(Bidirectional(LSTM(10, return_sequences = True)))
    model.add(Bidirectional(LSTM(10, return_sequences = False)))
    model.add(Dense(46))
    model.add(Activation('softmax'))

    adam = optimizers.Adam(lr = 0.001)
    model.compile(loss = 'categorical_crossentropy', optimizer = adam, metrics = ['accuracy'])

    return model
model = KerasClassifier(build_fn = deep_bidirectional_lstm, epochs = 200, batch_size = 50, verbose = 1)
model.fit(X_train, y_train)
y_pred = model.predict(X_test)
y_test_ = np.argmax(y_test, axis = 1)
print(accuracy_score(y_pred, y_test_))
이번에도 레이어를 여러개 추가하자 오히려 검증 결과가 떨어지는 것을 볼 수 있다. 복잡한 모델 선택으로 인해 학습이 제대로 되지 않았을 수도 있고, 학습 데이터가 과적합된 케이스일 수도 있다. 이렇듯 복잡한 구조를 갖는 인공신경망 모델을 학습시킬 때에는 여러 가지 경우의 수를 고려해 보아야 한다.
전체 코드
본 실습의 전체 코드는 여기에서 열람하실 수 있습니다!
12 Jul 2019
|
Python
Keras
Deep Learning
케라스
순환형 신경망 5 - 순환형 신경망 모델 만들기
Objective: 케라스로 RNN 모델을 구현해 본다
이번 포스팅에서는 조금 더 다양한 RNN 모델을 케라스로 구현하고 학습해 보자.
다중 RNN (Stacked RNN)
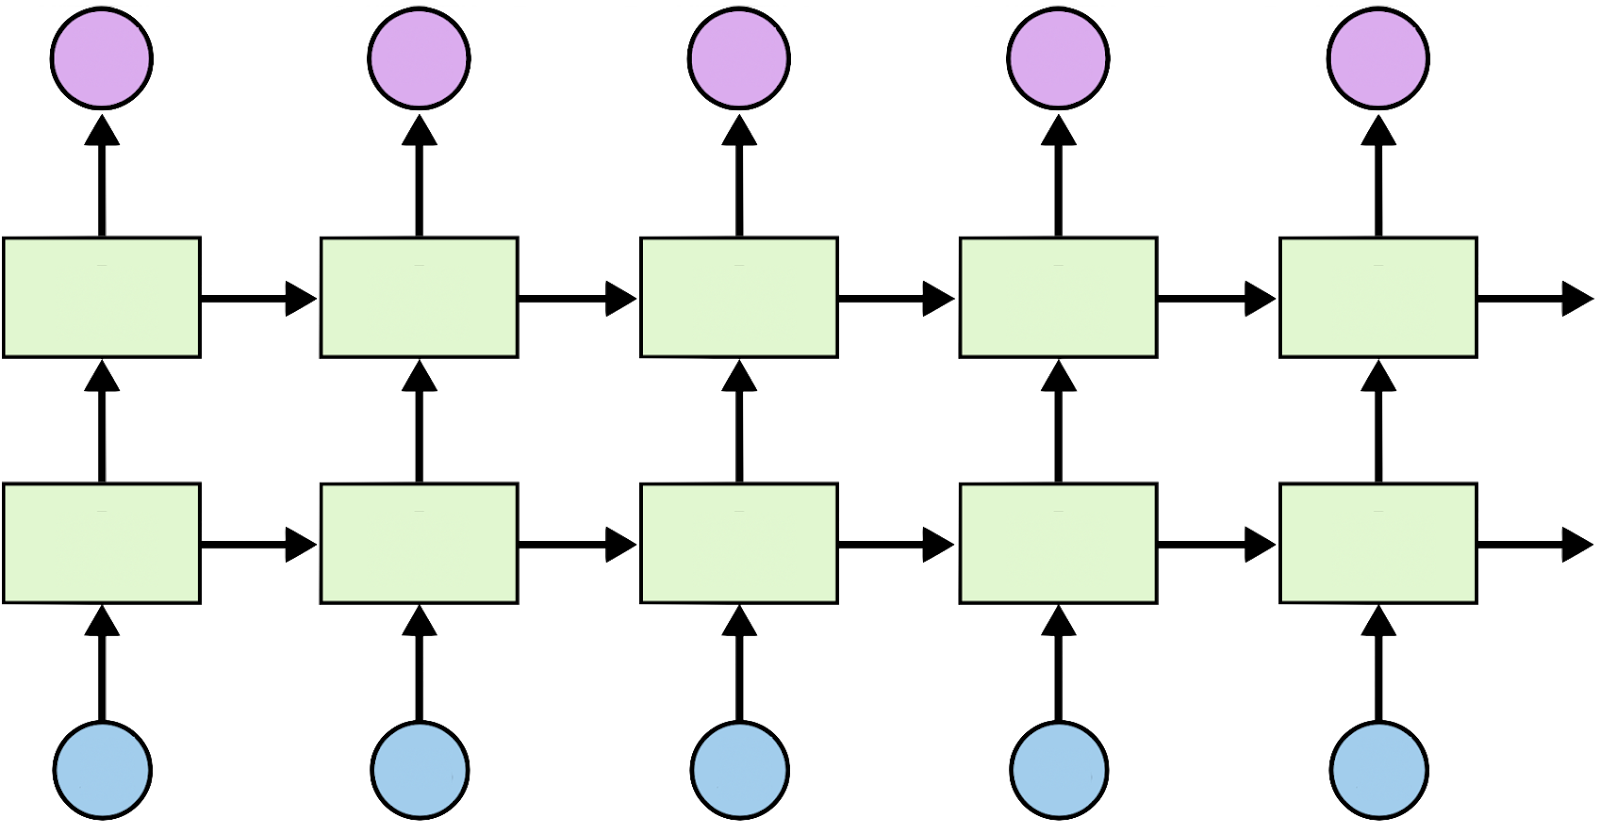
비슷한 MLP layer를 여러 층 쌓아 깊은 모델을 구현하듯이, RNN layer도 여러 겹 쌓아 다중 RNN을 구현할 수 있다.
데이터 셋 불러오기
RNN을 학습하기 위한 reuters 데이터 셋을 불러온다.
import numpy as np

from sklearn.metrics import accuracy_score
from keras.datasets import reuters
from keras.preprocessing.sequence import pad_sequences
from keras.utils import to_categorical

# parameters for data load
num_words = 30000
maxlen = 50
test_split = 0.3

(X_train, y_train), (X_test, y_test) = reuters.load_data(num_words = num_words, maxlen = maxlen, test_split = test_split)

# pad the sequences with zeros
# padding parameter is set to 'post' => 0's are appended to end of sequences
X_train = pad_sequences(X_train, padding = 'post')
X_test = pad_sequences(X_test, padding = 'post')

X_train = np.array(X_train).reshape((X_train.shape[0], X_train.shape[1], 1))
X_test = np.array(X_test).reshape((X_test.shape[0], X_test.shape[1], 1))

y_data = np.concatenate((y_train, y_test))
y_data = to_categorical(y_data)

y_train = y_data[:1395]
y_test = y_data[1395:]

# 데이터의 모양 출력하기
print(X_train.shape)
print(X_test.shape)
print(y_train.shape)
print(y_test.shape)
(1395, 49, 1)
(599, 49, 1)
(1395, 46)
(599, 46)
다중 RNN 모델(Stacked Vanilla RNN)
SimpleRNN 셀로 이루어진 layer를 여러 층 쌓아 다중 RNN 모델을 구현해 보자
from keras.models import Sequential
from keras.layers import Dense, SimpleRNN, Activation
from keras import optimizers
from keras.wrappers.scikit_learn import KerasClassifier

# 기본 RNN 모델을 구현하기 위한 함수
def stacked_vanilla_rnn():
    model = Sequential()
    model.add(SimpleRNN(50, input_shape = (49,1), return_sequences = True))   # return_sequences parameter has to be set True to stack
    model.add(SimpleRNN(50, return_sequences = False))
    model.add(Dense(46))
    model.add(Activation('softmax'))

    adam = optimizers.Adam(lr = 0.001)
    model.compile(loss = 'categorical_crossentropy', optimizer = adam, metrics = ['accuracy'])

    return model
KerasClassifier 함수로 RNN 모델을 생성한다(KerasClassifier 함수를 사용하지 않아도 만들 수 있다).
model = KerasClassifier(build_fn = stacked_vanilla_rnn, epochs = 200, batch_size = 50, verbose = 1)
모델 학습 및 검증
model.fit(X_train, y_train)
y_pred = model.predict(X_test)
y_test_ = np.argmax(y_test, axis = 1)
print(accuracy_score(y_pred, y_test_))
SimpleRNN 레이어를 여러 층 쌓아 다중 RNN을 구현해 보았지만, 정확도는 단층 RNN과 크게 달라지지 않는 것을 볼 수 있었다. 그렇다면 다른 RNN 셀을 활용한 RNN 모델을 구현하고 결과를 살펴보자.
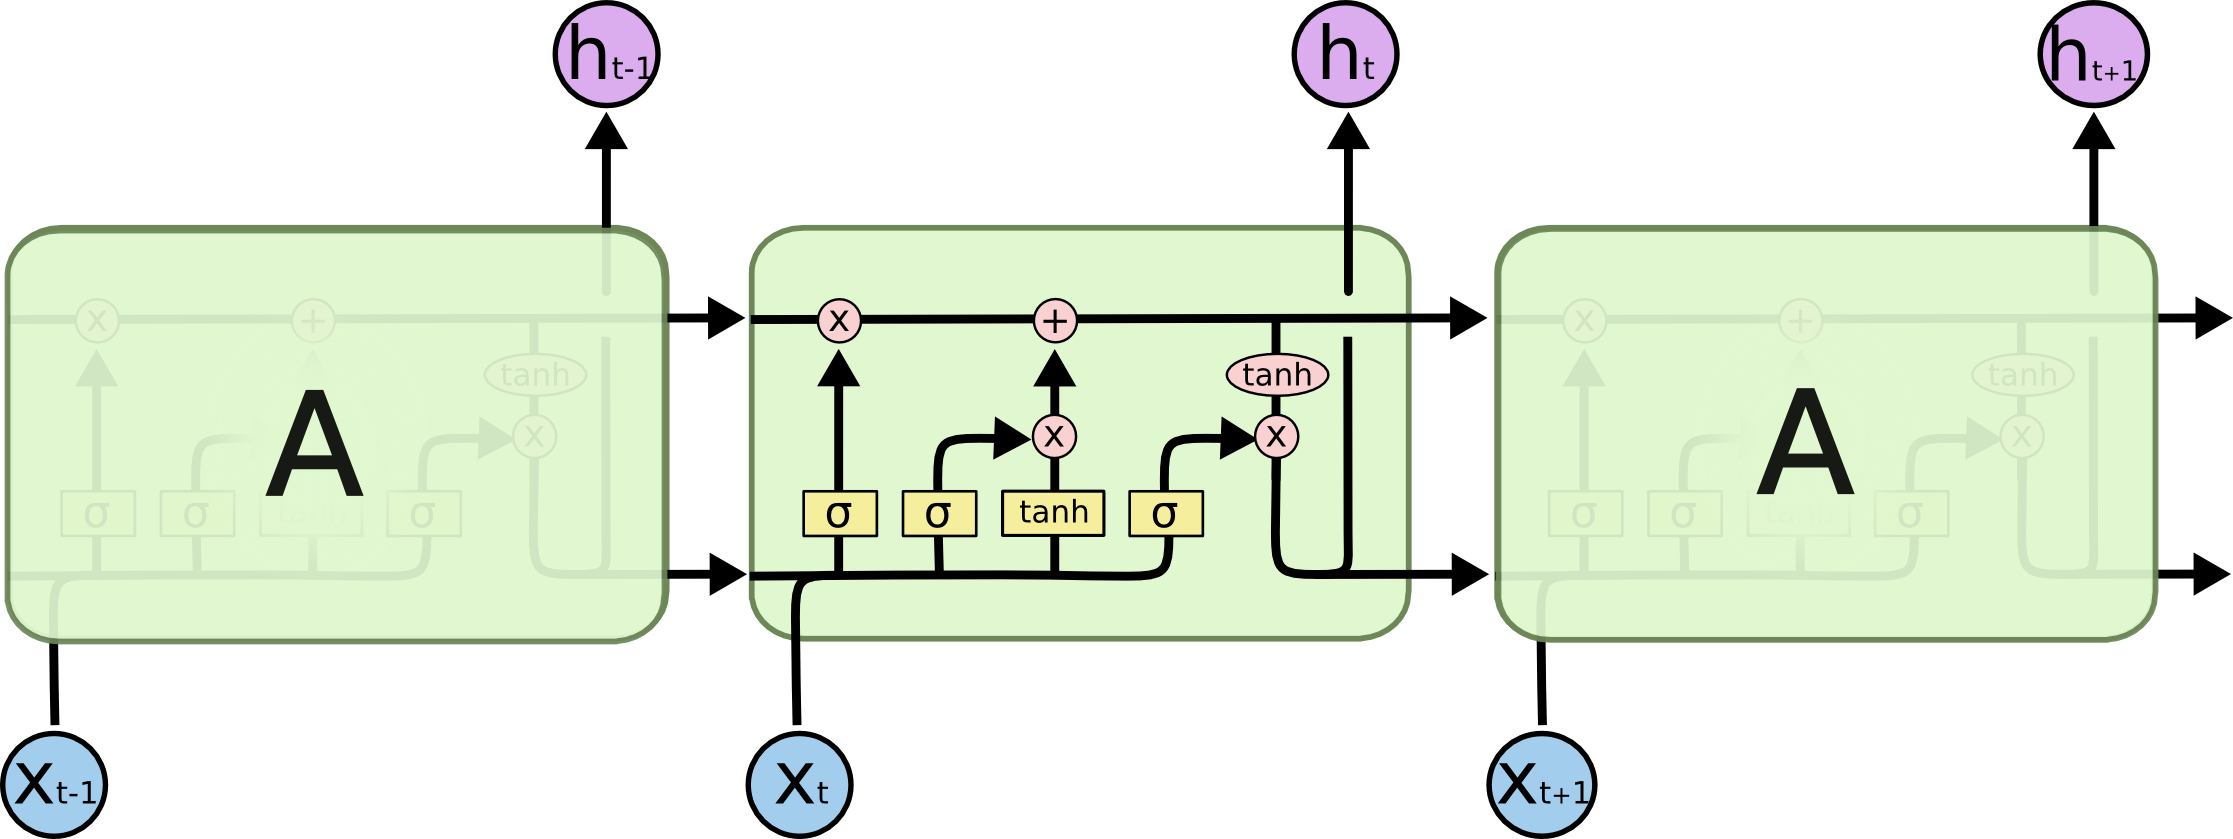
LSTM 모델
# 단층 LSTM을 구현하기 위한 함수
from keras.layers import LSTM

def lstm():
    model = Sequential()
    model.add(LSTM(50, input_shape = (49,1), return_sequences = False))
    model.add(Dense(46))
    model.add(Activation('softmax'))

    adam = optimizers.Adam(lr = 0.001)
    model.compile(loss = 'categorical_crossentropy', optimizer = adam, metrics = ['accuracy'])

    return model
model = KerasClassifier(build_fn = lstm, epochs = 200, batch_size = 50, verbose = 1)
model.fit(X_train, y_train)
y_pred = model.predict(X_test)
y_test_ = np.argmax(y_test, axis = 1)
print(accuracy_score(y_pred, y_test_))
기본 RNN 모델에 비해 LSTM 모델을 구현했을 때에는 정확도가 10% 가량 높아진 것을 볼 수 있다. 그렇다면 다중 LSTM모델의 결과는 어떠할지 한번 살펴보자.
# 다층 LSTM을 구현하기 위한 함수
def stacked_lstm():
    model = Sequential()
    model.add(LSTM(50, input_shape = (49,1), return_sequences = True))
    model.add(LSTM(50, return_sequences = False))
    model.add(Dense(46))
    model.add(Activation('softmax'))

    adam = optimizers.Adam(lr = 0.001)
    model.compile(loss = 'categorical_crossentropy', optimizer = adam, metrics = ['accuracy'])

    return model
model = KerasClassifier(build_fn = stacked_lstm, epochs = 200, batch_size = 50, verbose = 1)
model.fit(X_train, y_train)
y_pred = model.predict(X_test)
y_test_ = np.argmax(y_test, axis = 1)
print(accuracy_score(y_pred, y_test_))
다중 LSTM은 단층 LSTM에 비해 정확도가 다소 올라가는 것을 볼 수 있다. 또한 전반적으로 LSTM 모델이 기본 RNN 모델에 비해서 좋은 성능을 보이는 것을 확인해보았다.
전체 코드
본 실습의 전체 코드는 여기에서 열람하실 수 있습니다!
01 Jul 2019
|
Python
Keras
Deep Learning
케라스
순환형 신경망 4 - 순환형 신경망 모델 만들기
Objective: 케라스로 RNN 모델을 구현해 본다
지난 포스팅까지 RNN 셀에 대해서 알아보고 이를 케라스로 구현하는 방법에 대해 알아보았다. 이번 포스팅에서는 실제로 케라스를 활용하여 RNN 모델을 어떻게 구현하는지에 대해 알아보자.
RNN
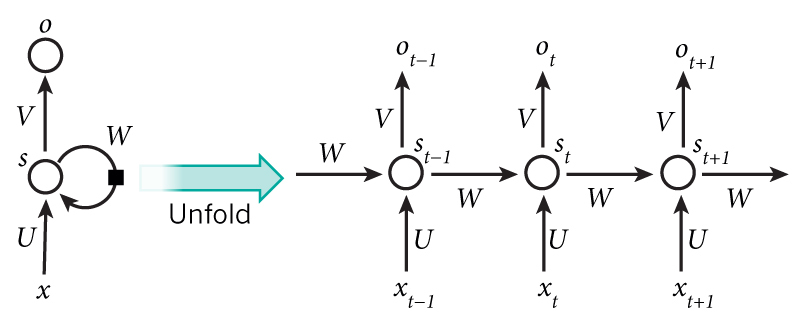
MLP나 CNN과 같은 Feedforward neural network는 universal approximator로 다양한 종류의 형태의 데이터에 우수한 성능을 자랑하지만, 순차형(sequential) 데이터를 학습하기 위해 최적화된 형태는 아니라고 할 수 있다. 다른 의미로는, CNN이나 MLP는 지난 입력값의 기억(memory)을 보존하고 있지 않다. 예를 들어, 말뭉치를 번역한다고 할 때, 문맥(context)을 충분히 고려하지 않을 수 있다는 단점이 있다.
이에 반면, RNN은 순환형 구조로 인해 지난 입력값에 대한 기억(memory)을 가지고 있다는 특성으로 인해 순차형 데이터를 처리하기 위해 최적화된 형태라고 할 수 있다.
데이터 셋 불러오기
RNN을 학습하기 위한 reuters 데이터 셋을 불러온다.
import numpy as np

from sklearn.metrics import accuracy_score
from keras.datasets import reuters
from keras.preprocessing.sequence import pad_sequences
from keras.utils import to_categorical

# parameters for data load
num_words = 30000
maxlen = 50
test_split = 0.3

(X_train, y_train), (X_test, y_test) = reuters.load_data(num_words = num_words, maxlen = maxlen, test_split = test_split)

# pad the sequences with zeros
# padding parameter is set to 'post' => 0's are appended to end of sequences
X_train = pad_sequences(X_train, padding = 'post')
X_test = pad_sequences(X_test, padding = 'post')

X_train = np.array(X_train).reshape((X_train.shape[0], X_train.shape[1], 1))
X_test = np.array(X_test).reshape((X_test.shape[0], X_test.shape[1], 1))

y_data = np.concatenate((y_train, y_test))
y_data = to_categorical(y_data)

y_train = y_data[:1395]
y_test = y_data[1395:]

# 데이터의 모양 출력하기
print(X_train.shape)
print(X_test.shape)
print(y_train.shape)
print(y_test.shape)
(1395, 49, 1)
(599, 49, 1)
(1395, 46)
(599, 46)
기본 RNN 모델(Vanilla RNN)
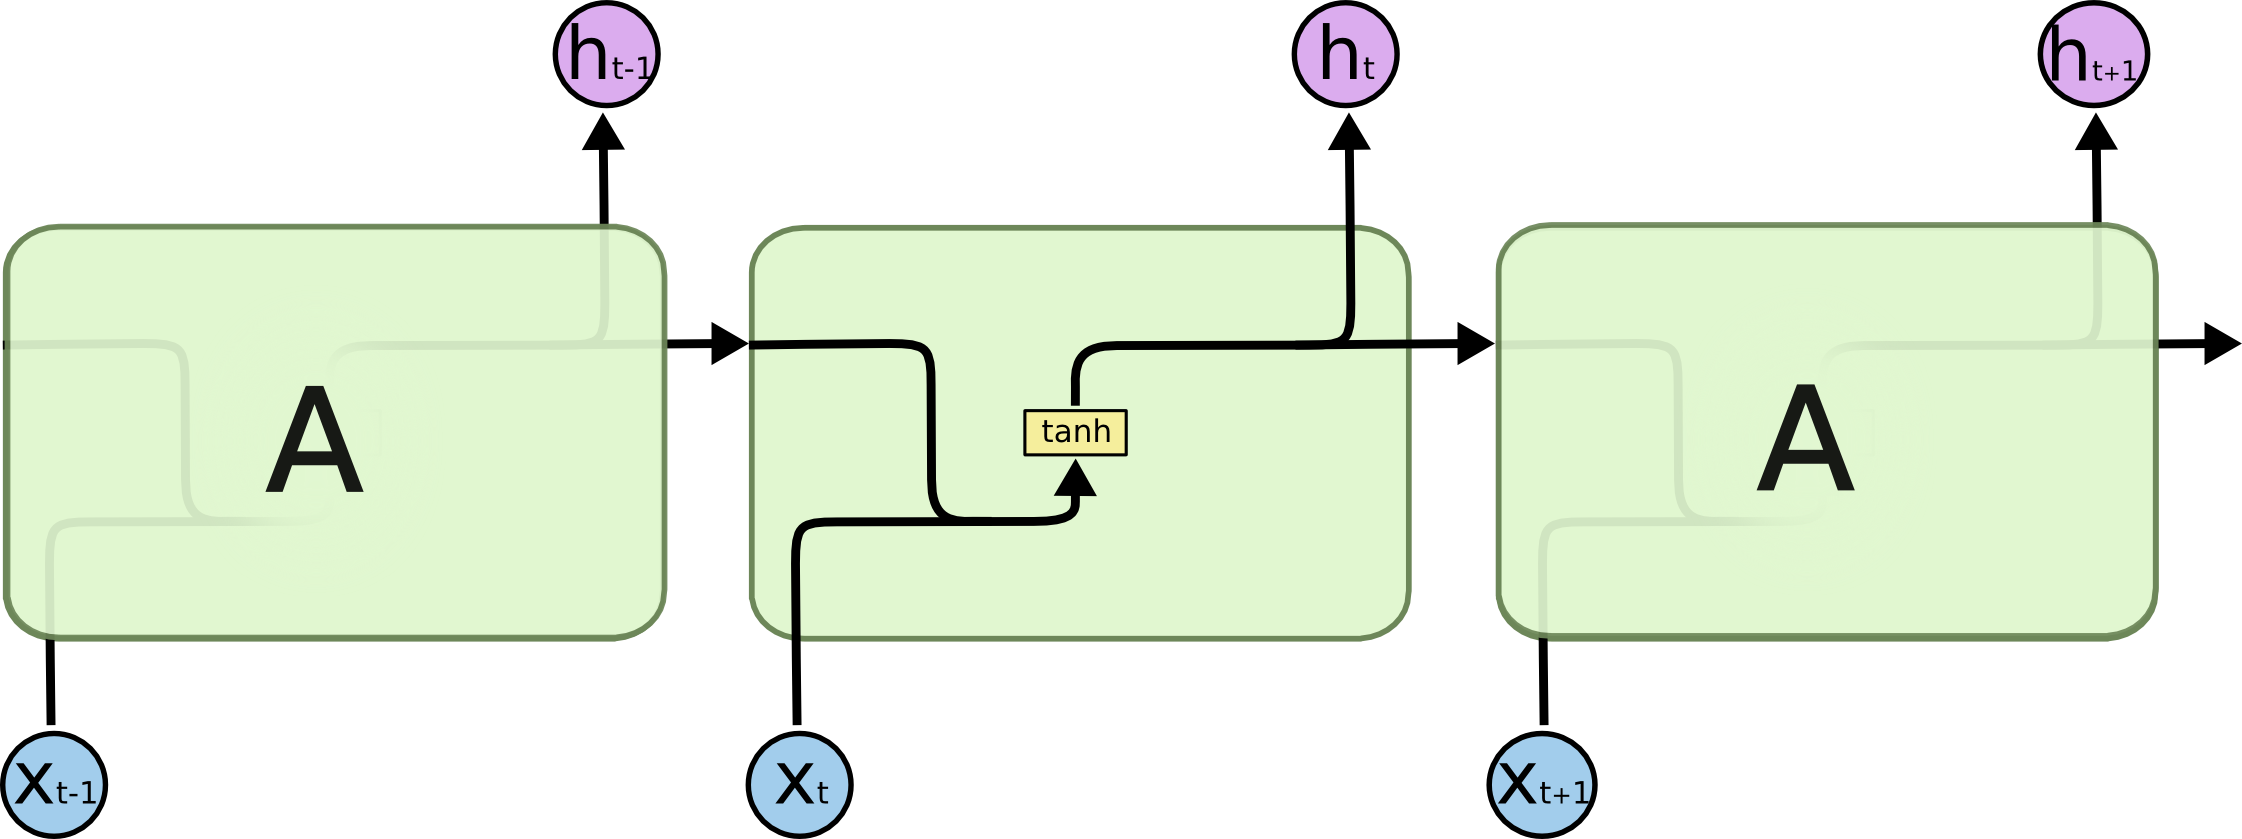
SimpleRNN 셀을 갖는 가장 기본적인 RNN 모델을 구현해 본다. 기본 RNN은 지난 포스팅에서 봤듯이 간단한 구조를 가지고 있어 long-term dependency를 효율적으로 처리할 수 없는 단점을 갖는다.
from keras.models import Sequential
from keras.layers import Dense, SimpleRNN, Activation
from keras import optimizers
from keras.wrappers.scikit_learn import KerasClassifier

# 기본 RNN 모델을 구현하기 위한 함수
def vanilla_rnn():
    model = Sequential()
    model.add(SimpleRNN(50, input_shape = (49,1), return_sequences = False))
    model.add(Dense(46))
    model.add(Activation('softmax'))

    adam = optimizers.Adam(lr = 0.001)
    model.compile(loss = 'categorical_crossentropy', optimizer = adam, metrics = ['accuracy'])

    return model
KerasClassifier 함수로 RNN 모델을 생성한다(KerasClassifier 함수를 사용하지 않아도 만들 수 있다).
model = KerasClassifier(build_fn = vanilla_rnn, epochs = 200, batch_size = 50, verbose = 1)
모델 학습 및 검증
model = KerasClassifier(build_fn = vanilla_rnn, epochs = 200, batch_size = 50, verbose = 1)
model.fit(X_train, y_train)
y_pred = model.predict(X_test)
y_test_ = np.argmax(y_test, axis = 1)
print(accuracy_score(y_pred, y_test_))
이번 포스팅에서는 기본적인 RNN 모델을 생성하는 방법에 대해 알아보았다. 다음 포스팅에서는 조금 더 복잡한 구조인 LSTM 모델 구현에 대해 알아보자.
전체 코드
본 실습의 전체 코드는 여기에서 열람하실 수 있습니다!
26 Jun 2019
|
Python
Keras
Deep Learning
케라스
순환형 신경망 3 - RNN 구조 기초
Objective: RNN의 기본적인 구조를 이해하고 케라스로 이를 구현해본다
지난 포스팅기본적인 RNN 셀(SimpleRNN)에 이어 LSTM에 대해 알아보았다. 이번 포스팅에서는 또 다른 형태의 RNN인 GRU에 대해 알아보자.
GRU
GRU는 Gated Recurrent Unit의 약자로, LSTM과 유사하게 forget gate가 있지만 output gate가 없다. 그러므로 기본적인 RNN 셀과 같이 hidden state가 없고, LSTM보다 적은 수의 파라미터로 학습이 가능하다.

케라스에서 GRU 구현하기
# 셀 사이즈 50의 lstm 셀 생성
gru = GRU(50)(Input(shape = (10, 30)))
print(gru.shape)
return_sequences 파라미터가 False로 설정된 경우
gru = GRU(50, return_sequences = False, return_state = True)(Input(shape = (10, 30)))
print(gru[0].shape)         # shape of output
print(gru[1].shape)         # shape of hidden state
return_sequences 파라미터가 True로 설정하는 경우.
gru = GRU(50, return_sequences = True, return_state = True)(Input(shape = (10, 30)))
print(gru[0].shape) # shape of output
print(gru[1].shape) # shape of hidden state
아래와 같이 output과 hidden state 를 서로 다른 변수로 받을 수도 있다.
output, hidden_state = GRU(50, return_sequences = True, return_state = True)(Input(shape = (10, 30)))
print(output.shape)
print(hidden_state.shape)
이번 포스팅에서는 기본적인 RNN 셀과는 조금 다른 구조를 갖는 GRU셀에 대해서 알아보았다. 다음 포스팅에서는 실제로 순차형 데이터의 학습을 위해 RNN 을 활용하는 방법에 대해서 알아보자.
전체 코드
본 실습의 전체 코드는 여기에서 열람하실 수 있습니다!
25 Jun 2019
|
Python
Keras
Deep Learning
케라스
순환형 신경망 2 - RNN 구조 기초
Objective: RNN의 기본적인 구조를 이해하고 케라스로 이를 구현해본다
지난 포스팅에서 RNN의 특징을 CNN이나 MLP와 같은 feedforward net과의 차이를 중심으로 알아보고, 가장 기본적인 RNN 셀(SimpleRNN)을 케라스로 구현하는 방법을 알아 보았다. 이번 포스팅에서는 비슷하지만 조금 더 우수한 성능을 내는 RNN 셀 구조인 LSTM에 대해 알아보자.
LSTM
LSTM은 Long Short-term Memory의 약자로, 기본적인 RNN 셀과 달리 hidden state 뿐 아니라 cell state도 다음 단계로 전이된다. LSTM의 이러한 복잡한 구조는 긴 sequence에서 정보가 유실되는 long-term dependency 문제를 어느 정도 완화해 준다. LSTM에 대한 자세한 설명은 이 포스팅을 참고한다.


케라스에서 LSTM 구현하기
# 셀 사이즈 50의 lstm 셀 생성
lstm = LSTM(50)(Input(shape = (10, 30)))
print(lstm.shape)
SimpleRNN과는 달리 LSTM은 2개가 아닌 3 가지의 state가 리턴된다(순서대로 output, hidden state, cell state). 동일하게 return_sequences 파라미터를 False로 설정하면 스칼라 값이 반환된다.
lstm = LSTM(50, return_sequences = False, return_state = True)(Input(shape = (10, 30)))
print(lstm[0].shape) # shape of output
print(lstm[1].shape) # shape of hidden state
print(lstm[2].shape) # shape of cell state
return_sequences 파라미터를 True로 설정하는 경우.
lstm = LSTM(50, return_sequences = True, return_state = True)(Input(shape = (10, 30)))
print(lstm[0].shape) # shape of output
print(lstm[1].shape) # shape of hidden state
print(lstm[2].shape) # shape of cell state
(?, ?, 50)
(?, 50)
(?, 50)
아래와 같이 output, hidden state, cell state를 서로 다른 변수로 받을 수도 있다.
output, hidden_state, cell_state = LSTM(50, return_sequences = True, return_state = True)(Input(shape = (10, 30)))
print(output.shape)
print(hidden_state.shape)
print(cell_state.shape)
이번 포스팅에서는 기본적인 RNN 셀과는 조금 다른 구조를 갖는 LSTM에 대해서 알아보았다. 다음 포스팅에서는 또 다른 형태의 RNN 구조에 대해서 알아보자.
전체 코드
본 실습의 전체 코드는 여기에서 열람하실 수 있습니다!


