Buomsoo Kim

Attention in Neural Networks - 12. Various attention mechanisms (1)

|

Attention Mechanism in Neural Networks - 12. Various attention mechanisms (1)

In a few recent postings, we looked into the attention mechanism for aligning source and target sentences in machine translation proposed by Bahdahanu et al. (2015). However, there are a number of attention functions such as those outlined in here. From now on, let’s dig into various attention methods outlined by Luong et al. (2015)

Global and Local attention - where the attention is applied

First, Luong et al. distinguishes global and local attention. Both have a common goal of estimating the context vector $c_t$ and the probability of the target word $p(y_t)$ at each timestep of $t$. However, two differs in where the attention is applied among timesteps in the encoder. Global attention is similar to what we have looked into in previous postings. It considers all hidden states of encoder ($h_t$) and aligns them with current decoder input.
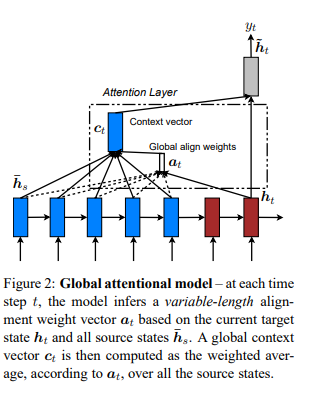
In contrast, local attention focuses on a small window of context and aligns source states in such window. By doing so, it is less computationally expensive and easier to train. It is a blend of hard and soft attention proposed by Xu et al. (2015)

“Our local attention mechanism selectively focuses on a small window of context and is differentiable. This approach has an advantage of avoiding the expensive computation incurred in the soft attention and at the same time, is easier to train than the hard attention approach.”

Thus, there is an additional step of alignment in local attention - i.e., searching for an aligned position $p_t$ for each target word at timestep $t$. Then, the context vector $c_t$ is similarly estimated to global attention but applied only to the context window of $[p_t - D, p_t + D]$. $D$ can be empirically selected by the developer. In other words, attention is applied to the local context of $2D+1$ timesteps.

Searching for aligned position

Two methods for estimating the aligned position are suggested by Luong et al. (2015) - (1) monotonic alignment (local-m) and (2) predictive alignment (local-p). Monotonic alignment simply sets $p_t = t$. The intuition behind local-m is that source and target sequences are, at least roughly, aligned in a monotonous fashion. Whereas predictive alignment “predicts” each $p_t$ with below function. $W_p$ and $v_p$ are model parameters that are trained and $S$ is the length of a source sentence.

\begin{equation} p_t = S \cdot sigmoid(v_p^{T}tanh(W_ph_t)) \end{equation}

Scoring functions - how to measure the similarity between inputs

Prior to estimating the context vector $c_t$, the (local or global) alignment weights $\alpha_t$ should be learned. $\alpha_t$ at each timestep of $s$ in source sentence can be calculated as below. $\bar{h_s}$ is the source hidden state at timestep $s$.

\begin{equation} \alpha_t(s) = \frac{exp(score(h_t, \bar{h_s}))}{\sum_{s’}exp(score(h_t, \bar{h_{s’}}))} \end{equation}

There are a variety of scoring functions, i.e., $score()$, . Three functions that are proposed by Luong et al. (2015) are dot, general, and concat functions. The intuition behind different types of scoring functions is similar to that of cosine similarity. In the cosine similarity function, dot product basically estimates similarity between two inputs. Similarly, scoring functions calculate similarity between the source and target hidden states.

In this posting, we closely looked into various attention mechanisms proposed by Luong et al. (2015). In the following postings, let’s see how they can be implemented with Pytorch. Thank you for reading.

References

Attention in Neural Networks - 11. Alignment Models (4)

|

Attention Mechanism in Neural Networks - 11. Alignment Models (4)

So far, we reviewed and implemented the Seq2Seq model with alignment proposed by Bahdahanu et al. (2015). In this posting, let’s try mini-batch training and evaluation of the model as we did for the vanilla Seq2Seq in this posting

Import and process data

This part is identical to what we did for mini-batch training of the vanilla Seq2Seq. So, I will let you refer to the posting to save space.

Setting parameters

Seting parameters are also identical. For the purpose of sanity check, the parameters can be set to as below.

ENG_VOCAB_SIZE = len(eng_words)
DEU_VOCAB_SIZE = len(deu_words)
LEARNING_RATE = 1e-2
NUM_EPOCHS = 10
HIDDEN_SIZE = 128
EMBEDDING_DIM = 30
DEVICE = torch.device('cuda') 

Encoder and Decoder

Similarly, we define the encoder and decoder separately and merge them in the Seq2Seq model. The encoder is defined similarly to the original model, so the emphasis is on the decoder here. Note how the training data is sliced to fit into the decoder model that processes mini-batch inputs.

class Encoder(nn.Module):
  def __init__(self, vocab_size, hidden_size, max_sent_len, embedding_dim):
    super(Encoder, self).__init__()
    self.hidden_size = hidden_size
    self.max_sent_len = max_sent_len

    self.embedding = nn.Embedding(vocab_size, embedding_dim)
    self.gru = nn.GRU(embedding_dim, hidden_size)

  def forward(self, source):
    source = self.embedding(source)
    enc_outputs = torch.zeros(self.max_sent_len, source.size(0), self.hidden_size).to(DEVICE)
    h0 = torch.zeros(1, source.size(0), self.hidden_size).to(DEVICE)  # encoder hidden state = (1, BATCH_SIZE, HIDDEN_SIZE)
    for k in range(source.size(1)):  
      _, h0 = self.gru(source[:, k].unsqueeze(0), h0)
      enc_outputs[k, :] = h0.squeeze()
    return enc_outputs

class Decoder(nn.Module):
  def __init__(self, vocab_size, hidden_size, embedding_dim, device):
    super(Decoder, self).__init__()
    self.hidden_size = hidden_size
    self.device = device
    self.vocab_size = vocab_size
    
    self.embedding = nn.Embedding(vocab_size, embedding_dim)
    self.attention = nn.Linear(hidden_size + hidden_size, 1)
    self.gru = nn.GRU(hidden_size + embedding_dim, hidden_size)
    self.dense = nn.Linear(hidden_size, vocab_size)
    self.softmax = nn.Softmax(dim=1)
    self.log_softmax = nn.LogSoftmax(dim = 1)
    self.relu = nn.ReLU()
  
  def forward(self, decoder_input, current_hidden_state, encoder_outputs):

    decoder_input = self.embedding(decoder_input)    # (BATCH_SIZE, EMBEDDING_DIM)
    aligned_weights = torch.randn(encoder_outputs.size(0), encoder_outputs.size(1)).to(self.device)
    
    for i in range(encoder_outputs.size(0)):
      aligned_weights[i] = self.attention(torch.cat((current_hidden_state, encoder_outputs[i].unsqueeze(0)), dim = -1)).squeeze()
    
    aligned_weights = self.softmax(aligned_weights)   # (BATCH_SIZE, HIDDEN_STATE * 2)
    aligned_weights = aligned_weights.view(aligned_weights.size(1), aligned_weights.size(0))
    
    context_vector = torch.bmm(aligned_weights.unsqueeze(1), encoder_outputs.view(encoder_outputs.size(1), encoder_outputs.size(0), encoder_outputs.size(2)))
    
    x = torch.cat((context_vector.squeeze(1), decoder_input), dim = 1).unsqueeze(0)
    x = self.relu(x)
    x, current_hidden_state = self.gru(x, current_hidden_state)
    x = self.log_softmax(self.dense(x.squeeze(0)))
    return x, current_hidden_state, aligned_weights

Seq2Seq model

Now we merge the encoder and decoder to create a Seq2Seq model. Since we have already defined the encoder and decoder in detail, implementing the Seq2Seq model is straightforward. Just notice how the hidden states of decoder (dec_h0) and weights (w) are updated at each step.

class AttenS2S(nn.Module):
  def __init__(self, encoder, decoder, max_sent_len, device):
    super(AttenS2S, self).__init__()
    self.encoder = encoder
    self.decoder = decoder
    self.device = device
    self.max_sent_len = max_sent_len

  def forward(self, source, target, tf_ratio = .5):
    enc_outputs = self.encoder(source)
    dec_outputs = torch.zeros(target.size(0), target.size(1), self.decoder.vocab_size).to(self.device)
    dec_input = target[:, 0]
    dec_h0 = torch.zeros(1, dec_input.size(0), self.encoder.hidden_size).to(DEVICE)
    weights = torch.zeros(target.size(1), target.size(0), target.size(1))   # (TARGET_LEN, BATCH_SIZE, SOURCE_LEN)
    for k in range(target.size(1)):
      out, dec_h0, w = self.decoder(dec_input, dec_h0, enc_outputs)
      weights[k, :, :] = w
      dec_outputs[:, k] = out
      if np.random.choice([True, False], p = [tf_ratio, 1-tf_ratio]):
        dec_input = target[:, k]
      else:
        dec_input = out.argmax(1).detach()

    return dec_outputs, weights

Training

Training is also done in a similar fashion. Just be aware of calculating the negative log likelihood loss. The output has one more dimension, i.e., batch size, so it needs to be reshaped to collapse into two dimensions to calculate the loss.

encoder = Encoder(ENG_VOCAB_SIZE, HIDDEN_SIZE, MAX_SENT_LEN, EMBEDDING_DIM).to(DEVICE)
decoder = Decoder(DEU_VOCAB_SIZE, HIDDEN_SIZE, EMBEDDING_DIM, DEVICE).to(DEVICE)
seq2seq = AttenS2S(encoder, decoder, MAX_SENT_LEN, DEVICE).to(DEVICE)
criterion = nn.NLLLoss()
optimizer = torch.optim.Adam(seq2seq.parameters(), lr = LEARNING_RATE)

%%time
loss_trace = []
for epoch in tqdm(range(NUM_EPOCHS)):
  current_loss = 0
  for i, (x, y) in enumerate(train_loader):
    x, y  = x.to(DEVICE), y.to(DEVICE)
    outputs, _ = seq2seq(x, y)
    loss = criterion(outputs.resize(outputs.size(0) * outputs.size(1), outputs.size(-1)), y.resize(y.size(0) * y.size(1)))
    optimizer.zero_grad()
    loss.backward()
    optimizer.step()
    current_loss += loss.item()
  loss_trace.append(current_loss)

Let’s try visualizing the loss trace with a plot. The loss continually decreases up to the 10th epoch. Please try training over 10 epochs for more effective training.

# loss curve
plt.plot(range(1, NUM_EPOCHS+1), loss_trace, 'r-')
plt.xlabel('Epoch')
plt.ylabel('Loss')
plt.show()

Evaluation and visualization

In mini-batch implementation of alignment models, learned weights need to be permuted as there is another dimension here as well.

%%time
test_weights = []
source, target = [], []
for i, (x, y) in enumerate(test_loader):
  with torch.no_grad():
    for s in x:
      source.append(s.detach().cpu().numpy())
    for t in y:
      target.append(t.detach().cpu().numpy())
    x, y  = x.to(DEVICE), y.to(DEVICE)
    outputs, current_weights = seq2seq(x, y)
    current_weights = current_weights.permute(1, 0, 2)
    for cw in current_weights:
      test_weights.append(cw.detach().cpu().numpy())

And each weight can be visualized using a matplotlib heatmap. Below is an example of visualizing the learned weights of the second test instance according to their saliency.

idx = 1

source_sent = [eng_words[x] for x in source[idx]]
target_sent = [deu_words[x] for x in target[idx]]

fig, ax = plt.subplots(figsize = (7,7))
im = ax.imshow(test_weights[idx], cmap = "binary")
ax.set_xticks(np.arange(len(source_sent)))
ax.set_yticks(np.arange(len(target_sent)))
ax.set_xticklabels(source_sent)
ax.set_yticklabels(target_sent)
plt.show()

In this posting, we implemented mini-batch alignment Seq2Seq proposed by Bahdahanu et al. (2015). In the following postings, let’s look into various types of attentional models beyond the Bahdanau attention. Thank you for reading.

Google newly launches Colab Pro! - comparison of Colab and Colab pro

|

Google Colab Pro

Google recently introduced Colab Pro, which provides faster GPUs, longer runtimes, and more memory. I have been using Colab since its inception and very satisfied with it overall. However, I recently experienced some limitations when I was running some deep learning code for my research project. Since it was a deep model with a huge amount of data, it took longer to train with Colab’s GPU. And it sometimes reached the maximum runtimes and disconnected from the server. Many of you would recognize that training a deep model again from a scratch because of a hardware failure is a nightmare for developers. I had to instead rely on high-performance computing services provided by my University and cloud computing services from my client.

Now, Colab Pro is here to prevent such nightmares. It enables faster training with improved GPUs, and also provides longer runtimes that can reduce disconnection.

Pricing

Colab Pro is $9.99 per month - a subscription service like Netflix. Adding the tax, it sums up to $10.86 per month in Arizona where I am living at. I think it is not a bad price if you have to use Colab occasionally. I remember I had to pay over $1,000 per month to use a cloud computing service provided by Naver Cloud Platform

Colab vs. Colab Pro

Now, let’s try comparing Colab and the Pro version to find out what it is worth and how to get the most out of it.

  Price GPU Runtime Memory
Colab Free K80 Up to 12 hours 12GB
Colab Pro $9.99/m (before tax) T4 & P100 Up to 24 hours 25GB with high memory VMs

GPU

With Colab Pro, one gets priority access to high-end GPUs such as T4 and P100 and TPUs. Nevertheless, this does not guarantee that you can have a T4 or P100 GPU working in your runtime. Also, there is still usage limits as in Colab.

Runtime

A user can have up to 24 hours of runtime with Colab Pro, compared to 12 hours of Colab. Also, disconnections from idle timeouts are relatively infrequent. However, they say it is also not guaranteed.

Memory

When running large datasets, it is often discouraging to hit memory limits. With Colab Pro, a user can get priority access to high-memory VMs, which have twice the memory. In other words, Colab users can use up to 12 GB of memory, while Pro users can enjoy up to 25 GB of memory up to availability.

Conclusion

In my opinion, the idea of subscribing to high-end computing services with around $10 per month is exciting. However, please note that Pro users have the priority access to the upgrades. They are dependent upon availability and not guaranteed 24/7. Therefore, I think Colab Pro is a cool tool to run a medium-weight machine learning model anywhere/anytime. Nonetheless, it is not an alternative to cloud high-performance computing services such as Amazon EC2. If you need to run a very deep model with a massive amount of data, I assure that you will need a high-performance computing.

All in all, I think using Colab Pro is adding another recently developed tool to your toolbox for practical machine learning for just $10/month. It is not a silver bullet, but can be definitely worth it if you use it wisely. As always, thank you for reading and hope this posting helped your data science journey!

References

Attention in Neural Networks - 10. Alignment Models (3)

|

Attention Mechanism in Neural Networks - 10. Alignment Models (3)

In the previous posting, we implemented the Seq2Seq model with alignment proposed by Bahdahanu et al. (2015). In this posting, let’s try training and evaluating the model with the machine translation data.

Training

As usual, we define the optimizers for the encoder and decoder and set the loss function as the negative log likelihood loss (NLLLoss()).

encoder_opt = torch.optim.Adam(encoder.parameters(), lr = 0.01)
decoder_opt = torch.optim.Adam(decoder.parameters(), lr = 0.01)
criterion = nn.NLLLoss()
loss = []
weights = []

Then, we create two for loops to iterate for a number of epochs within all instances. The epoch is denoted with the variable i and the index of the instance j. As briefly explained, the key difference with the vanilla Seq2Seq model is (1) memorizing hidden states from every encoder step and (2) calculating and reserving not just the final outputs but also aligned weights from the decoder. The encoder hidden states are saved in the variable enc_outputs and the decoder has three outputs, out, h0, and w.

for i in tqdm(range(NUM_EPOCHS)):
  for j in range(len(eng_sentences)):
    current_weights = []
    source, target = eng_sentences[j], deu_sentences[j]
    source = torch.tensor(source, dtype = torch.long).view(-1, 1).to(DEVICE)
    target = torch.tensor(target, dtype = torch.long).view(-1, 1).to(DEVICE)

    current_loss = 0
    h0 = torch.zeros(1, 1, encoder.hidden_size).to(DEVICE)

    encoder_opt.zero_grad()
    decoder_opt.zero_grad()

    enc_outputs = torch.zeros(MAX_SENT_LEN, encoder.hidden_size).to(DEVICE)
    for k in range(source.size(0)):
      _, h0 = encoder(source[k].unsqueeze(0), h0)
      enc_outputs[k] = h0.squeeze()
    
    dec_input = torch.tensor([[deu_words.index("<sos>")]]).to(DEVICE)
    for l in range(target.size(0)):
      out, h0, w = decoder(dec_input, h0, enc_outputs)
      _, max_idx = out.topk(1)
      dec_input = max_idx.squeeze().detach()
      current_loss += criterion(out, target[l])
      if dec_input.item() == deu_words.index("<eos>"):
        break

    current_loss.backward(retain_graph=True)
    encoder_opt.step()
    decoder_opt.step()

  loss.append(current_loss.item()/(j+1))

Evaluation & Visualization

Let’s try evaluating and visualizing 6th instance in the training data. The code below calculates weights from the decoder and memorizes them in a list without further training the model.

idx = 6   # index of the sentence that you want to demonstrate
torch.tensor(eng_sentences[idx], dtype = torch.long).view(-1, 1).to(DEVICE)
weights = []
with torch.no_grad():
  h0 = torch.zeros(1, 1, encoder.hidden_size).to(DEVICE)
  enc_outputs = torch.zeros(MAX_SENT_LEN, encoder.hidden_size).to(DEVICE)
  for k in range(source.size(0)):
    _ , h0 = encoder(source[k].unsqueeze(0), h0)
    enc_outputs[k] = h0.squeeze()
  
  dec_input = torch.tensor([[deu_words.index("<sos>")]]).to(DEVICE)
  dec_output = []
  for l in range(target.size(0)):
    out, h0, w = decoder(dec_input, h0, enc_outputs)
    weights.append(w.cpu().detach().numpy().squeeze(0))
    _, max_idx = out.topk(1)
    dec_output.append(max_idx.item())
    dec_input = max_idx.squeeze().detach()
    # current_loss += criterion(out, target[l])
    if dec_input.item() == deu_words.index("<eos>"):
      break

Then, such weights can be visualized with a matplotlib heatmap with below code. The darker the color, the more salient the token is in that step.

weights = np.array(weights)[:, :len(eng_sentences[idx])]
fig = plt.figure(1, figsize = (10, 5), facecolor = None, edgecolor = 'b')
ax1 = fig.add_subplot(1, 1, 1)
ax1.imshow(np.array(weights), cmap = 'Greys')
plt.xticks(np.arange(len(eng_sentences[idx])), [eng_words[i] for i in eng_sentences[idx]])
plt.yticks(np.arange(len(dec_output)), [deu_words[i] for i in dec_output])
plt.show()

Below is an example of such heatmap for saliency mapping. Note that the model is poorly trained, and not very much informative for this case. You can try further sophisticating and well training the model for better representation and evaluation.

In this posting, we looked into how we can train the encoder and decoder for the Seq2Seq with alignment. In the following posting, let’s see how we further improve the model for more efficient training. Thank you for reading.

References

Attention in Neural Networks - 9. Alignment Models (2)

|

Attention Mechanism in Neural Networks - 9. Alignment Models (2)

In the previous posting, we briefly went through the Seq2Seq architecture with alignment proposed by Bahdahanu et al. (2015). In this posting, let’s see how we can implement such models in Pytorch.

[Image source: Bahdahanu et al. (2015)]

Import packages and dataset

Here, we will again use the English-German machine translation dataset. So, the code will be largely identical to previous postings.

import re
import torch
import numpy as np
import torch.nn as nn
import torch.nn.functional as F
from matplotlib import pyplot as plt
from tqdm import tqdm

!wget https://www.manythings.org/anki/deu-eng.zip
!unzip deu-eng.zip

with open("deu.txt") as f:
  sentences = f.readlines()

Preprocessing data

This is also the same as previous postings for Seq2Seq. Let’s randomly sample 10,000 instances for computational efficiency.

NUM_INSTANCES = 10000
eng_sentences, deu_sentences = [], []
eng_words, deu_words = set(), set()
for i in tqdm(range(NUM_INSTANCES)):
  rand_idx = np.random.randint(len(sentences))
  # find only letters in sentences
  eng_sent, deu_sent = ["<sos>"], ["<sos>"]
  eng_sent += re.findall(r"\w+", sentences[rand_idx].split("\t")[0]) 
  deu_sent += re.findall(r"\w+", sentences[rand_idx].split("\t")[1])

  # change to lowercase
  eng_sent = [x.lower() for x in eng_sent]
  deu_sent = [x.lower() for x in deu_sent]
  eng_sent.append("<eos>")
  deu_sent.append("<eos>")

  # add parsed sentences
  eng_sentences.append(eng_sent)
  deu_sentences.append(deu_sent)

  # update unique words
  eng_words.update(eng_sent)
  deu_words.update(deu_sent)

eng_words, deu_words = list(eng_words), list(deu_words)

# encode each token into index
for i in tqdm(range(len(eng_sentences))):
  eng_sentences[i] = [eng_words.index(x) for x in eng_sentences[i]]
  deu_sentences[i] = [deu_words.index(x) for x in deu_sentences[i]]

print(eng_sentences[0])
print([eng_words[x] for x in eng_sentences[0]])
print(deu_sentences[0])
print([deu_words[x] for x in deu_sentences[0]])
[3401, 4393, 3089, 963, 3440, 3778, 3848, 3089, 2724, 1997, 1189, 3357]
['<sos>', 'when', 'i', 'was', 'crossing', 'the', 'street', 'i', 'saw', 'an', 'accident', '<eos>']
[3026, 3, 4199, 6426, 7012, 5311, 5575, 4199, 4505, 6312, 4861]
['<sos>', 'als', 'ich', 'die', 'straße', 'überquerte', 'sah', 'ich', 'einen', 'unfall', '<eos>']

Set hyperparameters

The hyperparameters that should be defined are also very similar to the settings in Seq2Seq. For convenience, we set the maximum sentence length to be the length of the longest sentence among source sentences.

MAX_SENT_LEN = len(max(eng_sentences, key = len))
ENG_VOCAB_SIZE = len(eng_words)
DEU_VOCAB_SIZE = len(deu_words)
NUM_EPOCHS = 10
HIDDEN_SIZE = 16
EMBEDDING_DIM = 30
DEVICE = torch.device('cuda') 

Encoder and Decoder

The encoder is very similar to Seq2Seq, but with a slight difference. As mentioned in the previous posting, we have to memorize the hidden states of all steps in source to align them with those in target. Therefore, we feed each input to the embedding and GRU layers to reserve the outputs.

class Encoder(nn.Module):
  def __init__(self, vocab_size, hidden_size, embedding_dim):
    super(Encoder, self).__init__()
    self.hidden_size = hidden_size

    self.embedding = nn.Embedding(vocab_size, embedding_dim)
    self.gru = nn.GRU(embedding_dim, hidden_size)

  def forward(self, x, h0):
    x = self.embedding(x).view(1, 1, -1)
    out, h0 = self.gru(x, h0)
    return out, h0


The decoder is also similar, but has an additional mechanism for alignment. Also, it has an additional input for hidden states from the encoder (encoder_hidden_state). In a for loop inside the forward() function, aligned weights for each source hidden state is calculated. The weights are saved to the variable aligned_weights. Then the weights are normalized with a softmax function (F.softmax()) and multiplied with the encoder hidden states to generate a context vector. It should be noted that many implementations of Bahdanau attention includes a tanh function and an additional parameter v to be jointly trained, but I did not include them for simplicity.

class Decoder(nn.Module):
  def __init__(self, vocab_size, hidden_size, embedding_dim, device):
    super(Decoder, self).__init__()
    self.hidden_size = hidden_size
    self.device = device
    
    self.embedding = nn.Embedding(vocab_size, embedding_dim)
    self.attention = nn.Linear(hidden_size + hidden_size, 1)
    self.gru = nn.GRU(hidden_size + embedding_dim, hidden_size)
    self.dense = nn.Linear(hidden_size, vocab_size)
    self.log_softmax = nn.LogSoftmax(dim = 1)
  
  def forward(self, decoder_input, current_hidden_state, encoder_hidden_state):
    decoder_input = self.embedding(decoder_input).view(1, 1, -1)
    aligned_weights = torch.randn(encoder_hidden_state.size(0)).to(self.device)
    for i in range(encoder_hidden_state.size(0)):
      aligned_weights[i] = self.attention(torch.cat((current_hidden_state.squeeze(0), encoder_hidden_state[i].unsqueeze(0)), dim = 1)).squeeze()
     
    aligned_weights = F.softmax(aligned_weights.unsqueeze(0), dim = 1)
    context_vector = torch.bmm(aligned_weights.unsqueeze(0), encoder_hidden_state.view(1, -1 ,self.hidden_size))
    
    x = torch.cat((context_vector[0], decoder_input[0]), dim = 1).unsqueeze(0)
    x = F.relu(x)
    x, current_hidden_state = self.gru(x, current_hidden_state)
    x = self.log_softmax(self.dense(x.squeeze(0)))
    return x, current_hidden_state, aligned_weights

In this posting, we looked into how we can implement the encoder and decoder for the Seq2Seq with alignment. In the following posting, let’s see how we can train and evaluate the model. Thank you for reading.

References